
You’ll want to start by inspecting your subfloor for rot and damage, then install moisture barriers on vulnerable areas. Prime the surface with a flexible epoxy primer, let it cure 10–24 hours, then sand it with 120-grit paper until it’s dull and matte.
Mix your epoxy according to directions, spread it evenly with a notched squeegee, and add decorative chips or metallics while it’s tacky.
Finally, let it cure fully—about five days—before heavy foot traffic. The specifics of timing and technique are important factors in the outcome.
Inspect and Repair Your Wood Floor Structure

Inspect and Repair Your Wood Floor Structure
Before you pour that epoxy, you’ve got to make sure your floor can actually handle it—and that means getting down on your hands and knees for a thorough inspection. I’ve learned the hard way that skipping this step leads to disaster.
Check for Wood Rot and Moisture Damage
Inspect beams and planks carefully for soft spots, discoloration, or that telltale musty smell. Old bathrooms often leak, causing wood rot that weakens your foundation. Press a screwdriver gently into suspect areas—if it sinks easily, you’ve got rot that needs replacing.
Complete Your Floor Prep
Remove dirt and mold using a 10% bleach solution, then let everything dry completely. Sink any protruding screws or nails flush below the surface. Fill large cracks with wood patching compound and sand smooth. This moisture repair work protects your epoxy investment.

【COMPLETE KIT WITH PRIMER】Each garage epoxy floor kit comes with everything you need, including primer and all necessary tools, ensuring a seamless application process from start to finish, making it an ideal choice for both DIY enthusiasts and beginners.

Durable Epoxy Acrylic Formula: Resists hot tire pickup, scuffing, cracking, peeling, and fading. KILZ 1-Part Epoxy Floor Paint delivers long-lasting protection and a satin finish that looks great on concrete surfaces.
Install Underlayment for Moisture-Prone Areas

I’ve learned that moisture is one of epoxy’s biggest enemies, which is why I’m going to show you how to install underlayment properly in damp-prone areas. We’ll cover two critical techniques—setting up your moisture barrier and staggering seams—that’ll keep water from sneaking underneath and ruining all your hard work. Getting these details right now means your epoxy coating will last longer and stay in place instead of peeling up six months down the road.

For use as a vapor barrier when installing Vinyl, laminate, SPC and engineered wood flooring

✔ Self sealing adhesive tape for ease of installation

3in1 Vapor Barrier Underlayment | 500 sq. ft bundle (5 rolls each 100 sqft)
Moisture Barrier Installation
Moisture causes significant damage to wood floors. Water seeps underneath, causing warping and rot that’ll compromise your entire project. That’s why I’m installing a proper moisture barrier before applying epoxy primer.
I’m screwing down a 12 mm underlayment sheet onto wooden planks, spacing fasteners every 15 cm for complete coverage. Here’s what I’m doing:
- Staggering seams to eliminate alignment lines where moisture might sneak through
- Leaving 0.5 cm free at damp room edges so the underlayment can expand naturally
- Using two underlayment plates on concrete surfaces for continuous protection
Once secured, I’ll seal all edges carefully. This moisture barrier protects my floor against dampness. Then I’m ready for epoxy primer on that protected, dry surface.
Seam Staggering Techniques
Seam Staggering Techniques
How you arrange those underlayment seams affects your ability to keep moisture out—I learned this after watching water find its way through perfectly aligned joints on a friend’s bathroom floor.
The Staggering Strategy
When I install my first layer of 12 mm underlayment sheets, I screw them down every 15 cm to the planks. Here’s what matters: I don’t line up the seams. Instead, I offset my second layer at least 30 cm from the first layer’s seams. This staggered pattern breaks moisture’s direct path through your floor.
Think of it like bricks in a wall—the overlapping pattern stops water from traveling straight through. This seam staggering technique combined with proper moisture control provides the protection your damp room needs for lasting epoxy performance.
Prime Your Subfloor for Epoxy Adhesion

Before you can apply your epoxy coating, you’ll need to prime that subfloor—and yes, this step actually matters more than you’d think. I learned this the hard way.
Why Priming Matters
A quality epoxy primer creates the foundation for everything that follows. It seals your wood substrate and prevents moisture from causing damage underneath your finish.
The Application Process
Mix Part A and Part B according to manufacturer instructions, then pour into your tray. Use a 3/8″ nap roller for the main surface, cutting in edges with a brush. For wood floors, I recommend flexible epoxy primers like Spartan Epoxies FLEX—they accommodate wood’s natural movement.
Curing Time
Allow 10–24 hours depending on temperature. Complete the moisture sealing before moving forward.
【PREMIUM MATERIAL】: Sandpapers Made Made from aluminium oxide for longer life; electro coated technology make grit distributed evenly; Will not fall apart, tear or crumble off during using。

120 Grits: Includes 8 sanding blocks (120 grit, medium), our sanding sponge is reusable, washable, and suitable for all your sanding needs

【MEETS ALL YOUR NEEDS】Atosun high grit sand paper set contains 45pcs wet dry sand paper assortment in grit 120, 150, 180, 240, 320, 400, 600, 800, 1000, 1200, 1500, 2000, 2500, 3000, 5000, 3 sheets of each grit. Variety of sandpaper grit can meet most of your daily usage.
Sand the Primer to Create a Clean Surface

Now that your primer’s dry, I’ll show you how to sand it smooth so your epoxy coating sticks properly. You’ll want to grab a 150 mm rotary sander loaded with 120-grit paper—this grit size works well for smoothing out rough spots without overdoing it. I’m aiming for about 2 minutes of sanding per square meter, which keeps the work manageable and gives me a uniform texture that’ll help that epoxy bond effectively.

HIGH-SHINE METALLIC FINISH - Adds a reflective, shimmering effect to epoxy floors for a modern look.

HIGH-SHINE METALLIC FINISH - Adds a reflective, shimmering effect to epoxy floors for a modern look.

HIGH-SHINE METALLIC FINISH - Adds a reflective, shimmering effect to epoxy floors for a modern look.
Grit Selection And Equipment
Sanding your primer layer is where the real prep work happens, and it’s one of those steps that’ll determine your final epoxy finish quality. I recommend using 120 grit paper—it’s coarse enough to remove roughness from your underlayment without gouging the primer surface. You’ll want a 150 mm rotary sander, which gives you consistent pressure across the floor. Plan roughly two minutes per square meter; this pace keeps you efficient without rushing.
Once you’ve sanded, here’s the important part: vacuuming thoroughly removes all dust particles that could compromise adhesion. When 70–80% of your primer appears dull and matte, you’ve achieved the correct substrate condition. You’re now ready for epoxy coating. This preparation results in a professional-grade surface.
Coverage Rate Per Square Meter
Getting your primer surface ready for epoxy isn’t just about making it look nice—it’s about giving your coating something solid to grip onto.
I’ve found that understanding your coverage rate per square meter is necessary when planning your sanding project. You’ll want to use 120 grit sandpaper with a 150 mm rotary sander, working at approximately 2 minutes per square meter. This pace maintains consistent abrading without overdoing it.
The Sweet Spot
When about 70–80% of your primer appears dull and uniformly matte, you’ve hit the mark. That’s when sanding alone suffices for preparing your surface. You’re creating the texture your epoxy coating needs to bond properly.
After finishing, vacuum thoroughly to eliminate all dust particles. This final step guarantees a clean foundation, allowing your epoxy coating to adhere properly and deliver the professional finish you’re after.
Surface Readiness Assessment Method
Once your epoxy primer’s dried completely, it’s time to sand it down and create that clean, textured surface your epoxy coating’ll grip onto. I grab my 150 mm rotary sander with 120-grit abrasive and work methodically—roughly 2 minutes per square meter does the trick. You’re aiming for that dull appearance across 70–80% of the surface, which signals you’ve achieved proper adhesion preparation.
Here’s what matters most: sanding smooths those rough spots and primes your floor for success. Once I’ve finished, I vacuum thoroughly to eliminate every speck of dust before coating. This step prevents debris from marring your final finish. Think of it as building a solid foundation—your epoxy system’ll bond well when you’ve done the groundwork right.
Select Your Epoxy System and Mix the Resin

What makes the difference in an epoxy finish on wood floors? Selecting the right epoxy system and mixing it correctly. I’ll walk you through this step.
I recommend selecting a quality brand like Spartan Epoxies, then deciding between metallic or flake finishes based on your wood’s character. Here’s what I do:
- Combine Part A resin and Part B hardener in the manufacturer’s 2:1 ratio
- Mix for 3–5 minutes until completely homogeneous
- Add 4 oz pigment powder per gallon for metallic accents
- Use clean buckets and keep the mixer submerged to avoid air bubbles
I prepare separate batches for white slick coat and metallic accent coat, combining them only when I’m ready to apply. This approach gives me control and prevents waste.


REPAIR DAMAGED WOOD: Fills and rebuilds missing sections to help restore windows, doors, trim, columns, posts, and other elements. Permanently repairs damage caused by weather, moisture, age, and pests.

PROFESSIONAL WOOD FLOOR RESTORER: Restores wood floors, leaving them with a beautiful glossy finish
Spread Your Epoxy and Add Decorative Elements (Optional)

Spread Your Epoxy and Add Decorative Elements (Optional)
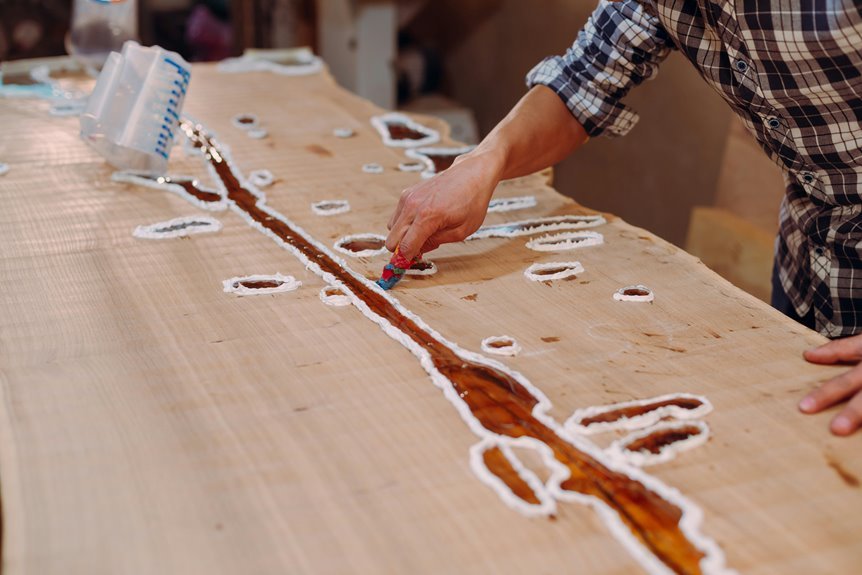
When you pour that mixed epoxy onto your primed floor, your preparation becomes evident. I use a notched squeegee to spread the epoxy coating evenly, then roll over it with my 3/8″ roller for consistent coverage. This primer application creates the base for what comes next.
| Decorative Element | Application Method | Best For |
|---|---|---|
| Metallic accents | Pour small ribbons | Modern elegance |
| Decorative chips | Sprinkle while wet | Textured appeal |
| Clear top coat | Final encapsulation | Protection |
Your Customization Options
Once I’ve spread the base coat, I add decorative touches. Small puddles of metallic paint or scattered decorative chips create visual interest on the floor. I work quickly while the epoxy’s still tacky, allowing each element to adhere properly. An optional clear top coat encapsulates everything, protecting your design investment for years ahead.

✅ Effective Moisture Protection – Blocks high moisture vapor emissions in concrete, preventing floor failures like bubbling, peeling, and delamination.

Durable Epoxy Acrylic Formula: Resists hot tire pickup, scuffing, cracking, peeling, and fading. KILZ 1-Part Epoxy Floor Paint delivers long-lasting protection and a satin finish that looks great on concrete surfaces.

【Fast Application & Quick Project Start】Designed for easy mixing and spreading with smooth leveling performance. Helps you refresh floors faster with minimal waiting time.
Let Your Epoxy Cure and Maintain It Properly

After you’ve finished spreading your epoxy and added those decorative touches, patience becomes your next tool. I know waiting’s tough, but epoxy curing requires time for durability. Here’s what happens during this critical phase:
- Surface cure at 24 hours: You can gently clean and clear debris, though the floor isn’t fully hardened
- Full hardening around 5 days: Avoid heavy traffic until then; this prevents permanent damage
- Top coat considerations: If applying urethane, sand with 120-grit after 24 hours, then apply within the 8–24 hour window
- Long-term maintenance: Use neutral pH cleaners, avoid dragging sharp objects, address nicks with epoxy filler, and reseal periodically
This patience investment protects your floor’s gloss and protection for years ahead.

Premium Material & Specifications: 6mil thick, 100% polyethylene construction in black, offering 360 sq. ft. coverage (unfolds to 6ft x 60ft). Engineered for long-lasting durability and moisture resistance.

For use as a vapor barrier when installing Vinyl, laminate, SPC and engineered wood flooring

COVERS LARGE AREAS – Each roll of this flooring underlayment covers 200 sq ft and is 3 mm thick, providing a thick underlayment layer with an integrated moisture barrier for enhanced floor protection.


